As we all know for making a substantial presentation, there is nothing superior to Apple’s self-groomed Keynote.’ But the biggest problem generally faced by many people is that Keynote is only available to I-Users, referring to people using either iPad, MacBook, or iPhone. So, many people are unable to benefit themselves and are forced to work on Microsoft Powerpoint instead. But, what if we told you that there is a way to use the outstanding features offered by Apple Keynote for Windows Operating System (.Key) PC devices, and trust me here? This is not some rib-tickler. All you have to do is follow the simple & straightforward step-by-step Apple Keynote for Windows Operating System method given below, and you will be able to access Apple Keynote for Windows Operating System PC.
So, are a fan of Apple’s Keynote but cannot afford a Mac or iPad? But, don’t worry, we have you covered as in this Apple Keynote for Windows Operating System article, we have come up with a simple guide on how to use & download Keynote for Windows Operating System device (PC or Laptop) free of cost. So, let’s first know,
Also check: Convert Keynote to PowerPoint
What is Keynote (.Key)?
The Keynote is a software used by most of the pro presentation makers to reach the top-level of authenticity because of its top-notch features and quality, which is far better than any usual presentation software like.
First of all, to use Apple Keynote for Windows Operating System, you will need a web browser with a working internet connection. As running Apple Keynote for Windows OS, our computers will be using Apple’s iWork which will connect you to iCloud apps which are similar to Google docs as it runs on Apple’s server, as far as you have an internet connection you can use it anywhere in the world even while working on Windows. You can access them after uploading it to the Keynote server where Files upto 1 GB can be stored, and images ranging upto 10 MB can be used for its presentation. So to use Apple Keynote for Windows Operating System (.Key) PC, just follow the simple steps below.
How to Get, Download & Install Apple Keynote for Windows OS
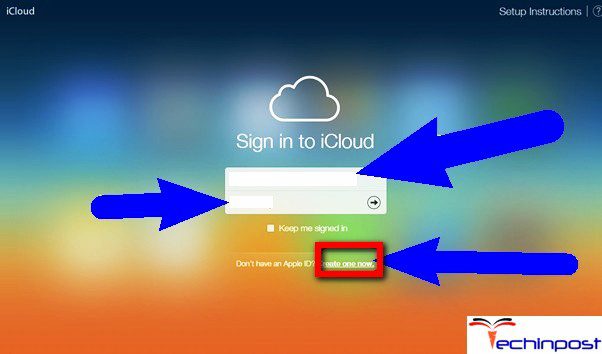
1. Go to the Official Website of iCloud –
- Open any Modern Web browser like Chrome, Mozilla, etc.
- Search for iCloud or just enter this web address www.icloud.com
- Log in to your Apple account
*Note: if you don’t have an Apple account you can easily make one by clicking on Create now
Make sure that you have a working internet connection so that you can access this Apple Keynote for Windows Operating System features without any trouble. If you are having any difficulty while logging in or if you are new to iCloud, just sign up by clicking on the create new account button, enter your desired email Id and password.
2. Click on the App icon with Keynote written over it –
- You will now be able to see four different option as shown in the screenshot below
Here, pages can be used to create professional business-related documents with available templates of CV, reports, etc. Then, numbers can help you in creating and managing spreadsheets. After which comes to the start of our Apple Keynote for Windows Operating System article Keynote, which can be used for creating Jaw-dropping Presentations and then comes settings that can be used to alter the account setting of your iCloud. So, select Keynote, then let’s get to the next phase of our Apple Keynote for Windows Operating System tutorial.
3. Open Keynote –
- Click on the App icon similar to the image below
- After clicking on the app icon eventually, Keynote’s Web app will open
- You will now be taken to a new window with a black background
- Now, click on the + symbol or on Create New Presentation to start your work
- You can also open presentations shared by others by clicking on the icon next to the + sign
- And there is also an option to various settings regarding Keynote which can be used to manage and view your presentations
Although you get to use all these apps here, Keynote is still in the Beta testing mode, which means you will not be able to use that many features as in a Mac or iPad, Still, yes, the features present here are not at all shorthanded; instead, you get some of the most extraordinary features any editor offers.
4. Make Presentations –
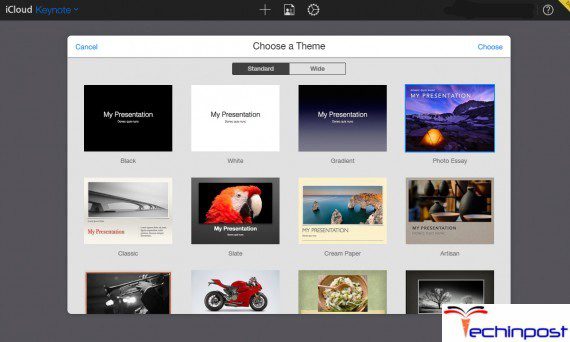
- Now a webpage will open with some of the most used templates
- Select your desired template according to your requirements and click to open it
- Now you will be able to see many listed features, and each of them carries different roles.
- There are plenty of features this app offers, and we have mentioned the role of each under the image below.
- If you want additional editing options double-click on the opened page as written on the picture below
So, after following this Apple Keynote for Windows Operating System (.Key) PC steps, we assure you that you will be able to use the best presentation maker Apple Keynote for Windows Operating System that too free of cost. If you want any guidance regarding how to use Apple Keynote for Windows Operating System or anything else relating to Keynote, don’t forget to comment below.
So that was it! I hope you liked our guide to using Apple Keynote for Windows Operating System (.Key) PC, and we would love to hear anything you have to say about your experience or any difficulty you are facing.






With a keynote, you can do hundreds of things! I love this app because with it we can do for example a video intro or an animated and colorful text! I’ve always been looking for an app like this! So don’t erase it from your apple device! So if I have to give a score out of 5 I will give 5!