Bluestacks is a fantastic software that allows users to run android based applications on windows and mac operating systems. But sometimes, when you upgrade your operating system from the previous version, or you upgrade Bluestacks itself. You encounter errors where it is impossible to operate the software. Basic troubleshooting like rebooting the system or re-launching the software does not solve the Bluestacks Not Working error problem. Today in this article we will be going to give you some methods which will surely fix this problem. We will be taking an in-depth look at the causes and ways to solve this Bluestacks Not Working error problem.

Causes behind Bluestacks Not Working Error Issue:
Bluestacks is a third party software. There can be various causes behind the improper working of the software. These causes help us choosing a suitable method to solve the Bluestacks Not Working error problem.
- Malware can corrupt the system files of the software
- Insufficient allocation of RAM to the software
- Virtualization Technology disabled in BIOS
- Conflicting Temporary Files
- Graphics Driver not updated
- Upgrading Bluestacks from the previous version to the latest
- Windows upgrade from the last version to the latest
How to Fix & Solve Bluestacks Not Working Error Issue
We have gathered methods to fix Bluestacks not working error problems. These methods have been found working and will surely fix your problem. Proceed to each step carefully to avoid any further errors.
1. Changing RAM Capacity & Graphics Mode to DirectX –
In this error Bluestacks Not Working on mac method, we will be allocating the required RAM to the software and changing the by default OPEN GL option to DirectX.
- STEP 1. Open Bluestacks and go to Option Button
- STEP 2. Go to Settings
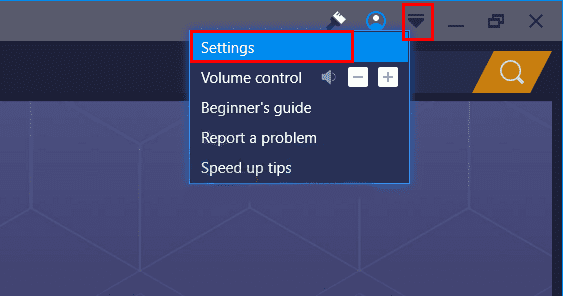
- STEP 3. Select Engine from Left plane and change to DirectX
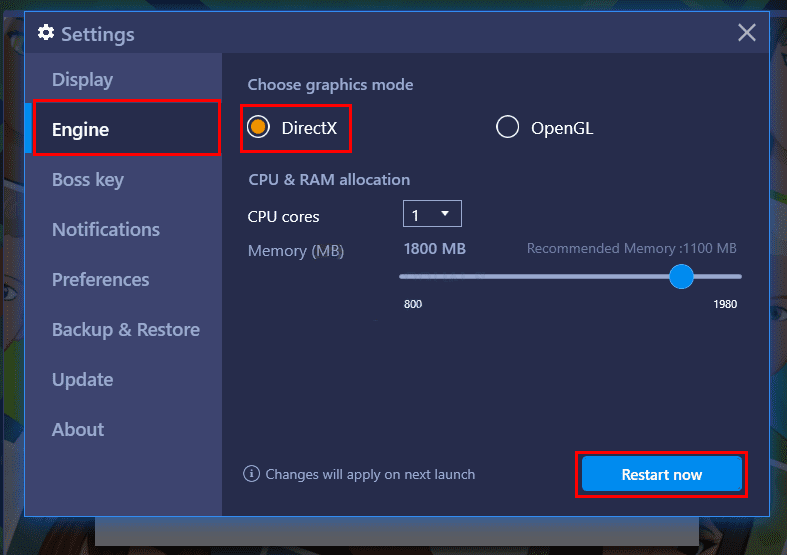
- STEP 4. Below you will see RAM allocation give it approx 2GB
- STEP 5. Finally, Reboot your System so that you can get rid of this error Bluestacks Not Working Windows 10 error.
2. Activating Virtualization Technology –
This error Bluestacks Not Working Windows method will ensure that virtualization technology is enabled in your system BIOS.
**NOTE: Below steps includes compatibility check whether your system supports virtualization technology.
FOR INTEL USERS:
- STEP 1. Download Intel Processor Identification Utility from intel’s official website.
- STEP 2. After downloading, kindly install it and run.
- STEP 3. Open the utility software and click on the CPU technologies tab.
- STEP 4. Look for the Intel® Virtualization Technology.
- STEP 5. If you see Yes in front of it, then your system supports this technology.
FOR AMD USERS:
- STEP 1. Download AMD V Detection Utility from AMD’s official website.
- STEP 2. After downloading, kindly install it and run.
- STEP 3. Open the utility software and check for you CPU technology
- STEP 4. The compatible systems will show, “The system is compatible with Hyper-V.”
If your system is compatible with Virtualization Technology, then proceed to the next error Bluestacks Not Working Snapchat steps.
- STEP 1. Reboot your system to BIOS.
- STEP 2. Navigate through BIOS using arrow keys and press ENTER to select an option.
- STEP 3. Look for option name Virtualization Technology or Intel VT for Direct I/O
- STEP 4. Kindly enable it using ENTER key, save changes, and reboot so that you will get back from this error Bluestacks Not Working on Mac Mojave error.
3. Clearing Temporary Files & Reinstalling Software –
In this error Bluestacks Not Working on Mac Catalina method, we will be firstly removing the temporary files and reinstalling the Bluestacks software.
- STEP 1. Go to start > run > type %temp% and hit Enter.
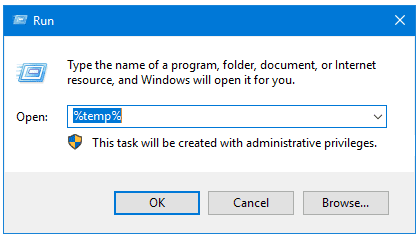
- STEP 2. After entering into the temporary files folder, select all files and delete them.
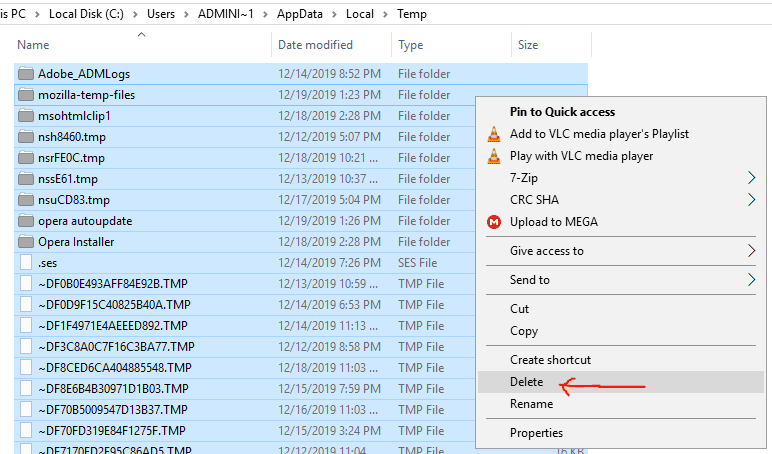
- STEP 3. Download the latest Bluestacks installer from the official website.
- STEP 4. After successful installation, Reboot your system so you can quickly get rid of this error Bluestacks Not Working on Windows 10 error.
4. Updating your Graphics Driver –
In this error Bluestacks Not Working Bluestacks method, we will be updating our graphic driver. Sometimes outdated graphics drivers interfere in the running of DirectX application.
- STEP 1. In your System Tray, you will see your graphic driver.
- STEP 2. Right Click on the icon
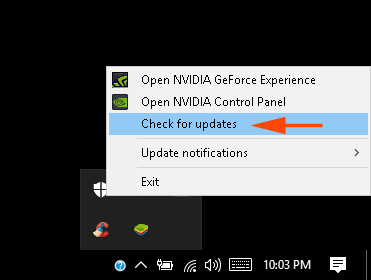
- STEP 3. From there, select “check for updates,” and updates will download.
- STEP 4. Reboot your system so that you can quickly get rid out of this error Bluestacks Not Working on PC error.
5. Running Bluestacks in Compatibility Mode –
With this error Bluestacks Not Working PC method, we can run the software in the required compatibility mode. Which has proved to be working for some users.
- STEP 1. Right, Click on the shortcut icon of Bluestacks.
- STEP 2. Go to Properties
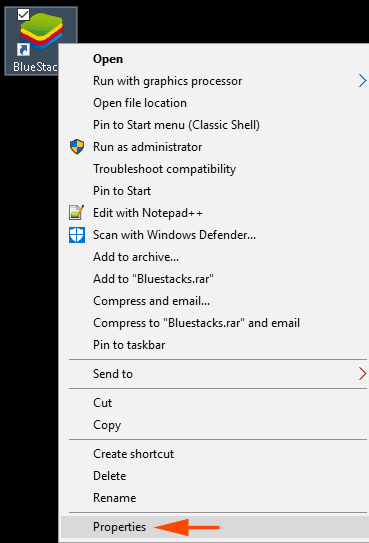
- STEP 3. Select the Compatibility tab and select the Run Compatibility shooter button.
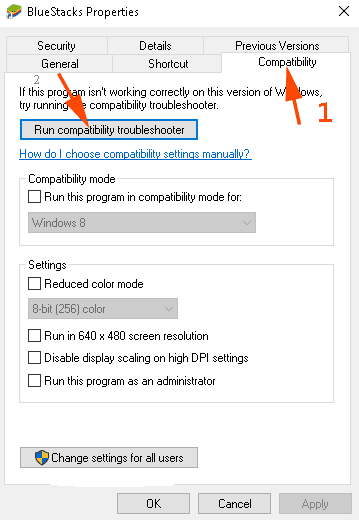
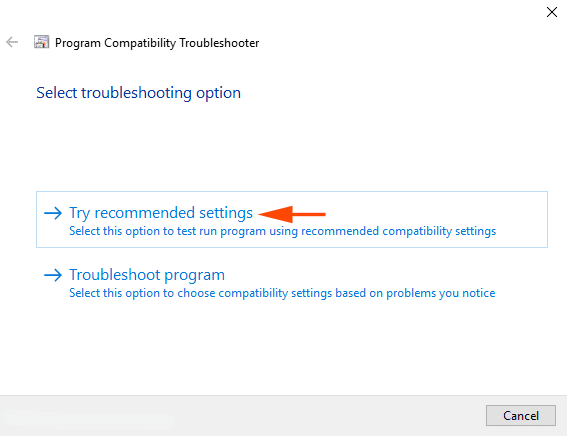
- STEP 4. Now Select Try recommended settings.
- STEP 5. Select Test the program.
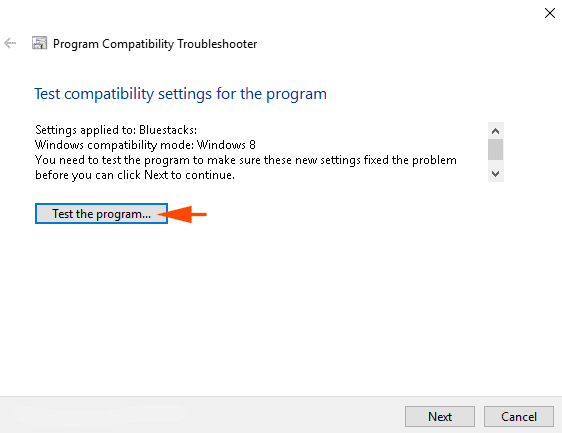
- STEP 6. Click next and try rerunning Bluestacks so you can easily & quickly get back from this type of error Bluestacks Not Working Windows 8 error issue.
Conclusion:
With this being the end of the quick guide. From the above steps, you will surely fix the Bluestacks Not Working error problem. We have given you five different methods that can solve this problem. All the major causes behind this issue have been taken care of. If you are still facing any difficulties, please mention your issue below. We will surely solve your Bluestacks Not Working error problem.
I hope you like this Bluestacks Not Working error quick guide. Which Method Works for you kindly tell us. For more similar articles and guides, do follow us. If you have any other methods to fix this problem, please share it with us. If you are facing any other errors in your operating systems, do not hesitate to tell us. And if you want us to write on something else, please mention the comments below. Thank you!

